

How To Build A Garden Pond
How to build a Garden Pond
To make a good garden pond pre planning the details before you start is crucial. This means right down to the detail of thinking about what types of plants you want to grow, as this will affect how you construct the pond and its depth, what sort of planting pockets you intend to have and other constructions considerations.
Here is a step by step practical guide how to build a pond and the various stages and considerations.
There are several stages :
- Deciding on the best position for the pond
- Size and depth of the pond
- Shape the hole
- Forming shelves and planting pockets
- Levelling the hole and shelves
- Soft lining (optional)
- Cement to secure (optional)
- Fit the liner Preformed or Butyl
- Fill and plant
On this page and the next is a step-by-step guide on each of these stages. There is also advice on what to do about a green pond, how to choose a garden pond liner, and ideas wildlife and garden ponds.
How to Build a Garden pond and where to put it
The position of the pond in the garden is important for several reasons. Putting the pond in the right place adds to the success of the pond by encouraging plants to flower and to discourage green water, caused by algae, as much as possible. The following considerations apply:
- A pond is best placed where it will get a good amount of sunshine, around 8 hours per day. This is particularly so if you want to grow water lilies which require sun to flower well.
- Site a pond away from deciduous trees because the risk of leaf fall into the pond. Fallen leaves add to the organic matter, which decays, increasing formation of algae which turns the pond green.
- If you are intending to have a water feature, such as a waterfall, the pump will require a power source which will need to be close to the pond. The combination of water and electricity requires a qualified electrician should undertake the electrical work. Remember also that a waterfall will have to be raised, so a small mound, or higher point, needs to be included in the design.
- Finally, often in a hot summer, pond water evaporates. As a result, it may be necessary to top it up, so the pond site needs to be within reach of a hose. Also, check and be sure not to site the pond in an area where there are any drains, cables or pipes that you may dig into when excavating the hole.
- Most importantly, a pond really needs to be in a flat area and not constructed on a slope. The water in the pond will always find the level, which means if the pond is on a slope, the water will lie level and it will look a little odd. This can be overcome, but it would be necessary to build up one end of the pond so that it becomes level, and then disguise the built up area, perhaps as a waterfall or if using bricks, as a seating area. When consider where to place your pond, always remember the water will be level even if the pond is not.
Apart from these considerations, it comes down to personal choice where to put a pond; near the patio/seating area so you can sit and enjoy the tranquillity and the wildlife, or hidden in a secluded part of the garden to create a different area of interest.
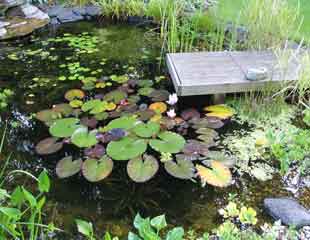
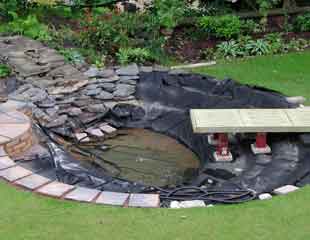
Before you dig the hole, remember maintenance. Garden ponds require some attention and periodically it may be necessary to get into the pond to reach the plants in the centre if they cannot be reached from the pond edges. This is best done wearing waders and if the pond is too deep, the water will be close to the top of the waders. There is risk when you bend down to pick up the plant from the bottom of the pond the water will seep into the waders. Easy access to the middle of the pond can be provided by building a jetty which looks good as well see image.
Building a Garden Pond: Size and depth
Before you can dig out the pond, you need to decide how deep you want the pond to be and this will depend what you are going to do with the pond. A minimum depth would be around 60 cms which would be sufficient for non ornamental fish and most pond plants. There are some types of lilies, Nymphaea alba (Common white water lily) which has planting depth of 30-90 cms, but 60cms will accommodate most plants. In addition, many attractive plants are marginals which need shallow areas and so before constructing the pond, it's helpful to consider what plants you would like to grow. Bear in mind that different plants require particular depths of water to grow depending on the variety and type. This is why forward planning is important down to detail, such as what plants are to be grown. Otherwise, you may dig out the pond and find the depths are wrong for what you would like to grow.
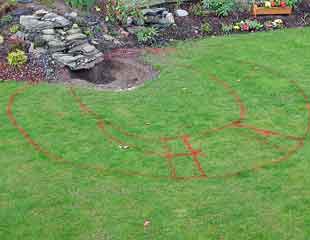
Check the conditions the plant requires, how deep it needs to be and its spread. The size of the pond will depend the space available and personal preference. It is a good idea to mark out the proposed pond with garden hose, or sand in a plastic bottle, string, or paint spray. This gives you a visual plan showing the position and size of the pond relative to the rest of the garden, see image .
If one of the primary reasons for building your pond is to attract wildlife, there will need to be shallow areas where wildlife can get into the water and a shallow sloping beach for access is essential. Steep sides are difficult for wildlife to navigate.
How to dig out and shape a Garden Pond
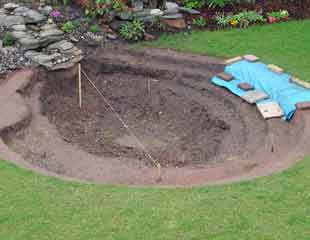
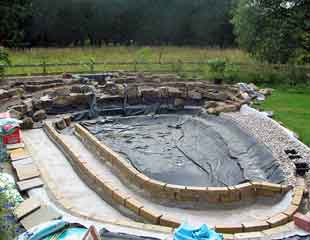
Once you have marked out the pond, the next step is to dig it out. Depending on the size you can do it by hand or hire help with a digger. Even if you get a digger to shift the bulk of the soil, the finishing and shaping is best done by hand. You must ensure the pond and all the shelves are level, this is essential. Use wooden pegs around the pond and check using a spirit level to ensure it is level. The image shows pegs in place with string to check the level.
When building a pond it is important to ensure the pond is absolutely level which is crucial, all planting pockets are flat, and that all stones are removed as they are a threat to the integrity of the liner.
The nature of the ground where the pond is being dug can cause problems particularly if it is stony, or wet. At this stage, is worth spending time removing all pebbles, stones and sharp edges. Pond liner is expensive and if punctured obviously it will leak, which is exactly what you don't want as that is a major headache to solve. Weight of water causes pressure pushing down on any stones which can then puncture the liner. Careful preparation at this stage is tedious but worthwhile in the long run. The other problem with flinty ground is that it is very difficult to shape the pond and shelves, rocky ground does not hold its shape and if this is a problem, it can be overcome by cementing the pond.
Wet ground is a challenge. If your garden is close to the water table or in wet ground, contrary to instincts, this is a problem when constructing a pond. You may guess that the land is close to the water table because of pooling water after rain, areas of wet or boggy ground in the garden, or the presence of water loving plants. Wet ground will causing pooling in the bottom of the pond during construction and this in itself is a problem. Once the hole is dug the fact it fills repeatedly with water can once the liner is in place, can cause a build up pressure under a pre formed or Butyl liner pushing the liner or parts of it upwards.
One way to deal with the problem is by a change in design to raise the pond above the water level. Use landscaping to raise the edges of the pond so that the liner does not have to be laid so deep. Alternatively, build a permanent pipe or channel to funnel the water out as in the image. When digging started on the pond in the image, it was unknown that the position was over a spring well and the problem could only be resolved with permanent drainage. By that time a very large hole had been dug, and so not everything can be planned for. If you look closely at the image (the one above the liner image) you will see a channel right in the centre lowest point of the pond excavation where a drainage pipe is being laid to take away the spring well water which otherwise would lie under the pond.
For all ponds, once the hole is dug out it needs to be lined with sand. This should be a firm layer of several centimetres, more if you are on stoney ground. This is needed to protect the liner, and the sand acts as a cushion. Remove all stones and sharp objects from the hole before adding a protective underlay of soft sand. A preformed liner will need to be placed on the ground where the pond is to be constructed, which is best drawn around to the shape of the liner. Use a cane to measure the depth of the preformed liner and then dig out to that level. If your pond is quite deep and large, consider how to make the maintenance easier. Pond plants require attention such as cutting back, especially lilies, which if growing in the centre of the pond will need to be accessed. This can be done either by getting into the pond or by constructing a Jetty. If you intend getting into the pond, make it easy and at the construction stage plan a set point of access into the pond with some step down free from planting.
Making plant shelves and planting pockets in a pond
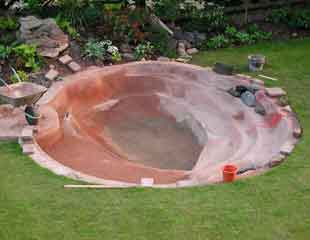
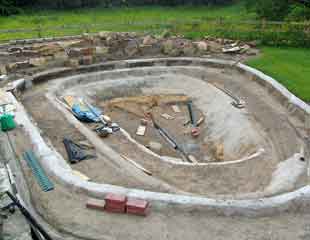
The image shows a pond which has been cemented because the ground was flinty and would not hold a shape. Building a pond depends on the ground and these are all ideas from which you can pick and choose what suits your garden. In the image you can see clearly the shelves for baskets at different depths.
Important to the construction of the pond is planting depths of the various pond plants. When planting into the garden border, the plant label shows the planting depth required and also by virtue of the plant size. Under water in a pond you are creating the planting environment, different depths for different pond plants according to their growing requirements.
If you intend to grow in baskets, you will need to incorporate shelves in the side of the pond structure. It sounds obvious but measure the size of the baskets and allow for extra growth to make the size of the shelf, and ensure it is level. The depth of the shelf should be between 20-30cms. The vertical sides of the shelves should slope gently around 20 degrees to prevent the soil caving in.
If you are growing plants around the edge of the pond this can be done either on a long shelf to accommodate baskets, or without baskets, by creating an internal wall forming a planting pocket which will contain the planting within that area. The image left shows in the (currently) unlined area two larges shallow planting pockets. This can look more natural, see image, but requires more construction work. In a planting pocket growth is not as controllable as in a basket. Some pond plants are very vigorous and can be invasive and should be grown in baskets to contain them.
Planting pockets enable you to achieve a naturalistic planting style whilst still keeping control of the plants, many of which are vigorous growers. To make a large planting pocket form a large shallow shelf about 10 cms below the water and along the edge lying inwards of the pool, build a shallow wall to act as a container for the planting pocket. The wall will contain cement which will need to be sealed and there are various aqua sealants on the market. It brushes on with a paintbrush as a clear varnish and ensures the wall is sealed.
Updated 28.10.2019
How To Build A Garden Pond
Source: https://www.sundaygardener.co.uk/how_to_build_a_garden_pond.html
Posted by: masonhimought.blogspot.com
0 Response to "How To Build A Garden Pond"
Post a Comment